Installing Snort with Mysql and ACID BASE
 Leave a Comment
Location: Somewhere in a fan noise filled and brightly lit room…
Date: Jan 3, 2010
Time: 2314 UTC
“Hey John come look at this spike in traffic on port 1434 going to 10.0.1.23!” ,Tony exclaimed.
“Yeah, I saw that on 10.0.1.52 as well, looks like a SQL injection attack to me.”
“This one looks like it got through though, I see some outbound traffic on 6667 on that database server as well. There shouldn’t be any traffic on that port, that is IRC chat. The firewall should block it”.
John quickly SSH’ed into the firewall and checked the output of ipchains to determine the default deny and any IRC rules. Much to his surprise all outbound traffic was allowed.
“What!!” John screamed out.
It just occurred to him that the firewall guys had just replaced the aging firewall that was attached to the DMZ. John frantically searched for the binder that contained the installation and configuration for the firewall installation. Just has he suspected, the binder’s last date was Dec 18, 2009. That was before the firewall was swapped out.
“No documentation, that’s great. How may times do I have to emphasize documentation! This will look great on the incident report” John said to himself.
Meanwhile Tony was setting up tcpdumps to capture the data for later forensics analysis.
Tony yelled to John from across the room “John, get the web database folks on the phone to see if they can start locking that system down”
John replied, “Dude it’s almost midnight, and we don’t have a good standby number for anybody.”
“Well there is only one thing to do then, we need to contain the problem and start documenting it. We need to close those ports to stop the leak.”
“But that means no one will be able to login to the ecommerce site, that means lost revenue”
“We better call the boss, and he won’t be happy”, Tony stated solemnly after some thought.
“Well maybe he can call the database folks and find out why that server wasn’t locked down correctly”
“Why do you think it was their problem? It could have been a zero-day attack, I checked Dshield and there are huge spikes in 1434. Could be the underground is exploiting a flaw that isn’t public yet”
“Well either way, this isn’t good. Let’s lock it down before anymore data leaks out.”
“Ok, its your call until the boss gets here”
“Do it!”
This is a fictional scenario that could happen in the real world. Poor documentation, configuration errors, zero-days and slow response time could plague any business network and create opportunities for breaches. Here is where a post analysis tool comes into to play. An intrusion detection system is not designed to stop attacks, but they make the watchful administrator aware of potential breaches or configuration problems. It also provides information to create a more accurate incident report that can identify the progression of the attack and which attack vector was used. This can be of tremendous value to help thwart attacks against other systems.
Enter SNORT.
With the constant attacks against networks it is essential to have a Intrusion Detection System (IDS) in place and functional. The IDS needs to be robust and easy to read the mountains of data that comes pouring in. Snort is an Open Source product that is free to use and is very customizable.
Snort charges for the rules subscription called “VRT Certified Rules”. If you are serious about keeping your IDS systems the most up to date you must pay for the rules set. You can receive the rules free of charge by registering. However, the free rules are 30 days old. If you manage a network you know that a lot can change in 30 days.
Snort on Ubuntu
Steps:
- Use apt-get to retrieve the snort-mysql (Use your host network for the listen address range, e.g 192.168.1.0/24)
- Use apt-get to retrieve the mysql-server package. Follow prompts for passwords (use your own password!! do not leave blank)
- Follow the instructions below to setup the database
———-Snippets taken from the snort-mysql debian package README—————–
CREATING THE DATABASE
———————–
In order for the above to work you need to create first
a database.
Consider that you have defined the following information when asked
to in the Debconf dialogs when installing the package:
Database User: snort
Database Password: (Use your own password here)
Database name: snort
For Mysql you can do this:
[ running as an mysql user with admin privileges ]
$ mysql -u root -p
(Type in the password you just created during the mysql-server installation)
mysql> CREATE DATABASE snort;
mysql> grant CREATE, INSERT, SELECT, UPDATE on snort.* to snort@localhost;
mysql> grant CREATE, INSERT, SELECT, UPDATE on snort.* to snort;
mysql> SET PASSWORD FOR snort@localhost=PASSWORD(‘INSERT YOUR OWN PASSWORD HERE‘);
mysql> flush privileges;
mysql> show grants for ‘snort’@’localhost’;
mysql>exit
Run the command below:
$ zcat /usr/share/doc/snort-mysql/create_mysql.gz | mysql -u snort -D snort -pYOUR OWN PASSWORD HERE
To do this remove the file ‘/etc/snort/db-pending-configuration’ and then do ‘/etc/init.d/snort start’. Confirm that snort is working and up
by running ‘/etc/init.d/snort status’ and reviewing the messages in the /var/log/daemon.log syslog file.
Before starting snort you will have to edit the /etc/snort/snort.conf file.
Find the lines
# (#DBSTART#)
output database: log, mysql,
# (#DBEND#)
Change the output line to: output database: log, mysql, user=snort password=YOUR OWN PASSWORD HERE dbname=snort host=localhost
4. Install apache2 web server (apt-get install apache2)
5. Install acidbase application (apt-get install acidbase)
The package manager will walk you through the setup. You will need to enter the root database password, the database user (snort), the database name (snort) and the database password. It will also ask if you want it to install the configs for apache2. Select Apache2 for autoconfiguration. By default only the localhost has access to the apache site. “http://localhost/acidbase”
You will have to connect and have acidbase create the required fields for the snort database. This can be accomplished by hitting the button listed on the main page to create the tables.
Additionally you will have to edit the /etc/apache2/conf.d/acidbase.conf file and add any additional ip addresses or ip ranges that you want remote access from.
STS-128 Launch Seen from Panama City, FL
I had the rare opportunity to witness a Space Shuttle launch from over 320 miles away. My vantage point was In Panama City, FL.
I was amazed at how bright it was, it cast a beautiful orange glow over the water at Earl Gilbert Park. I have witnessed many ISS overhead passes and I expected to see something similar. I was very wrong!
The pictures simply do not do it justice.
See the gallery for the full resolution pictures. Unfortunately in my excitement I bumped the Tripod and caused some shake in one of the pictures.


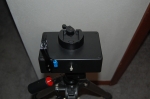
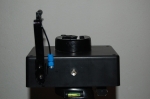
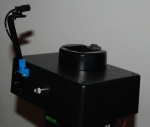
Nikon D Series Lightning Trigger with Arduino

Taken from inside garage
I wanted to make a lightning trigger for the D40 camera to capture some of nature’s most beautiful displays. I also thought it would interesting to capture some fireworks this 4th of July. So off to google I went. I saw several projects that pointed me in the right direction but I needed to get them all together. I started out with the code required to activate the remote shutter for the Nikon. I found some code here: Thing-a-Day Site(code didn’t work) . The code on the page had some issues compiling. I then followed the replies and I saw a poster with his own code that links to ilpleut.be. I followed the link that the code at ilpleut.be (code that worked) looked very elegant and complete. So i decided to try it. It worked, and as advertised, every ten seconds it triggered the Nikon. The only thing needed was to add the detector mechanism.
Lightning Detector:
**VERY IMPORTANT** For lightning safety visit: NWS Lightning Safety
I found a simple schematic to actually capture the sudden flash in light at this site. The schematic was simple and easy to build. They used a wired trigger for the Canon 3OD. For this project I am adapting it to trigger the Nikon D40 using the infrared transmitter.
Parts List
1 – 220 Ohm resistor (IR LED Current Limiter)
1 – 100k Ohm resistor (for Photoresistor)
1- Arduino (Purchase an Arduino: Modern Devices, Spark Fun, adafruit)
1 – Photoresistor (recommended) or Phototransistor
1 – Green or Red LED (Triggering Status LED)
1 – Potentiometer (optional if you use Version 1.1)
Wiring
Use the schematics below to wire the detector and IR Transmitter to the arduino. There are two versions available, one with an adjustable trigger setting and one that you can hard set in the code.
NOTE: You can modify the TRIGGER_THRESHHOLD value to get the best results for your situation. You can also add a delay to tweak the actual follow-on shots.
Camera Setup
To setup the Nikon you must go to Menu; Custom Setting Menu; Release Mode; Change to Quick Repsonse Remote. You must then Change the Remote on Duration setting, it can be setup up to 15 minutes.
The code below is complete. No additional libraries are necassary.
Version 1.0:
- Download Nikon Remote Lightning Arduino PDE File
- Schematic for the Nikon D Series Lightning IR Remote shutter
Important: If you want to add a potentiometer to change the value of the TRIGGER_THRESHOLD use the below links for the PDE file and schematic
Version 1.1:
- Download Nikon Remote Lightning with potentiometer adjustment arduino PDE
- Schematic for the Nikon Remote with Potentiometer adjustment
Thanks to Aurelien Antoine and Maurice Ribble!!
Project Pictures
(Includes submissions from other hobbyists)
Credit given below each image
-

- Lightning picture

-

- photodiode


-

- Submitted by Jim Martin

-

- Submitted by Jim Martin

-

- Submitted by Jim Martin

-

- Submitted by Jim Martin

-

- Submitted by Jim Martin

-

- Submitted by Jim Martin

-
- Submitted by Jim Martin

-
- Submitted by Jim Martin

-
- Submitted by Jim Martin

-

- Submitted by Jim Martin

-

- Submitted by Jim Martin

-

- Submitted by Jim Martin

-

- Submitted by Jim Martin

-

- Blog Author

-

- Blog Author

-

- Credit: Joe

-

- Credit: Joe

-

- Submitted by J Martin

-

- Frank’s Completed Lightning Trigger

Dell PowerEdge Server Administration – Using Dell OpenManage Server Administrator
Dell PowerEdge Server Administration – Using Dell OpenManage Server Administrator
Important Links
-
Custom CLI Menu for generating reports – Created by blog Author
Dell’s OpenManagement server administration tool is a powerful hardware monitoring and reporting tool. You are able to view virtually all of the hardware and bios information with a few simple commands.
I use it to collect system information and keep track of installed hardware and the current state of the hardware.
For example if you want to know how many physical disks are installed and what their capacities are you can type the command at the command prompt:
>omreport storage pdisk controller=0 (Change to 1 if you want to view the second controller)
and what virtual RAID containers are on the server
> omreport storage vdisk controller=0 (Change to 1 if you want to view the second controller)
To view a summary of the Server you type
>omreport system summary
View Chassis temperatures:
>omreport chassis temps
These commands will display the results in the console window but that is not very useful when filing for future reference. To send these commands to a file you would:
>omreport system summary -fmt cdv -outc Summary.csv
This will output the file in a semi-colon delimited file, which is not every excel friendly. To change it to a comma delimited file you must first type:
>omconfig preferences cdvformat delimiter=comma
Any files outputted with a –fmt cdv will then be delimited by a comma, which can be directly opened with excel without having to import data and manually selecting semi-colon as the delimiter.
These are just a few example of the Open Manage Server Administrators reporting and configuration tool. It is a powerful tool that will help you keep track of any server information or changes performed on the server.
To make my life easier (and hopefully yours) I have created a menu driven tool that will automatically run a most reports. I use this tool to run reports on all my dell servers and archive them to a secure share. This helps with any support issues or track hardware changes performed on the servers. I would recommend that this be performed upon the installation of any new server and when any significant hardware changes are made. If you need any help please feel free to post a comment.
Klik – Your one click installation of Linux software
Klik is a relatively new and very easy way to install and try applications on Linux. I have tried several large applications and they all work flawlessly. You have to download and install the client installation first, but that is easily accomplished by a wget command line that is on the homepage. After that you can download and run a plethora of great Linux Apps! Unlike other application installations that may require extensive dependency checks, this is a single download and execute file. If you do not want the application anymore you simply delete the file. You can also place the file on removable media and carry the application with you. It is perfect for beginners and advanced users alike. Give it a try!
Klik Homepage
SAMBA and SELINUX -Things you need to know
I decided to setup Samba using one of my existing Linux servers utilizing Fedora Core 9. I have a filer (OpenFiler) that I use for most of my storage but I like to have a “backup” system to send files to. My first problem setting up Samba was permission denied at directories to which I knew the permissions were set correctly. After some digging and trial and error I found out the SELinux was the issue denying access. The smb.conf file clearly states what is required to set the proper permissions but if you use Webmin or other samba admin interface so you may not see the instructions unless you go digging.
If you create your own directory to place files in you will have to use the chcon -t samba_share_t /path command to prepare it so SElinux will allow Samba to access it. Additionaly if you want to setup home drives you will have to “turn them on” for SELinux by using the setsebool -P samba_enable_home_dirs on command.
SELinux is a great security tool to leave enabled but is somewhat troublesome when things just don’t seem to work correctly. With a little digging (or Googling) and patience you will be glad you left SELinux enabled.
Here is the SELinux snippit, important commands are BOLD:
#—————
# SELINUX NOTES:
#
# If you want to use the useradd/groupadd family of binaries please run:
# setsebool -P samba_domain_controller on
#
# If you want to share home directories via samba please run:
# setsebool -P samba_enable_home_dirs on
#
# If you create a new directory you want to share you should mark it as
# “samba-share_t” so that selinux will let you write into it.
# Make sure not to do that on system directories as they may already have
# been marked with othe SELinux labels.
#
# Use ls -ldZ /path to see which context a directory has
#
# Set labels only on directories you created!
# To set a label use the following: chcon -t samba_share_t /path
#
# If you need to share a system created directory you can use one of the
# following (read-only/read-write):
# setsebool -P samba_export_all_ro on
# or
# setsebool -P samba_export_all_rw on
#
# If you want to run scripts (preexec/root prexec/print command/…) please
# put them into the /var/lib/samba/scripts directory so that smbd will be
# allowed to run them.
# Make sure you COPY them and not MOVE them so that the right SELinux context
# is applied, to check all is ok use restorecon -R -v /var/lib/samba/scripts
Extending linux volumes with Fedora Core or LVM
To extend a Volume Group and Logical Volume Group to a new Physical Disk
Commands:
Open the Logical Volume Manager
# lvm
lvm>pvcreate /dev/sdb
lvm>vgextend VolGroup00 /dev/sdb
lvm>lvextend -L30G /dev/VolGroup00/LogVol00
lvm>exit
# ext2online /dev/VolGroup00/LogVol00
# df -h
To verify the additional 30GB
note: sdb is the scsi drive, the drive you add could be a ide which would be a hdx x being the drive designation
Hurricane IKE Links and Feeds
Webcams and Live streams
- Live News Feeds – Live Local News and Radar -Very Nice, bandwidth intensive
- KHOU Live news feed – High quality news stream
- WebCamPlaza.net – Webcams and Live Feeds directory listing
- Ustream .tv Live Cam View from TX – Live chase vehicle
- Usrteam.tv direct satellite feeds from news vans
- Galveston Scanner and Skywarn
- Galveston, TX Webcams
- Houston Webcams
- Surfside, TX Surf Cam
- Houtson Skyline Cam
- Corpus Christi Surf Cam
- Dallas, TX Fire and Ambulance Live Scanner – Go straight to live feed
Hurricane Pages
- Crown Weather Page – A TON of maps, models and discussions
- National Hurricane Center Page for IKE
- Wunderground Page
Latest GEOS IR
Server Crash
If you are looking for the Techie Bytes blog, I am sorry to say the server crashed and I am rebuilding a new one. The blog will be here permanently and the content will be resposted as soon I can recreate it. Sorry for the inconvenience.
MythDora 4.0 and Hauppauge PVR-150 with IR Blaster Support
I wanted to outline a few steps that I had to take to get the IR blaster to work with MythDora. MythDora is my favorite MythTV distro, it is by far the best polished and complete MythTV system that I have found. I was perfectly happy with the setup, that is until I got digital cable. Then the need for the IR Blaster arose. I went as far as making a serial IR blaster that would have worked had I not had Scientific Atlanta Explorer 2200. That is where the search for answers led me to Mark’s Brain Dump. A day later here I am with a working setup. I also wanted to condense the process for others that may be encountering the same issues and/or want to use MythTV but are hesitant because of the digital box. I want to add that the Hauppauge IR Blaster might be the only IR blaster that will operate your digital or satellite box. I found that my serial IR Blaster that I made did not send the codes correctly for my SA 2200. Without any further ado let’s get started: I want to thank the MythDora developers and Mark at “Mark’s Brain Dump” for all the information and PVR-150 package. Without them this would not have been possible. What you’ll need and how to install them:
- WinTV PVR-150 (NOT the MCE version) NOTE: There have been some reports that people are receiving a replacement HVR-1600 or HVR-1500 in the PVR-150 box. I bought mine at CircuitCity and had the correct one.
- S-Video and/or Composite video cables, Audio cable (RCA to 1/8″ Mini stereo plug) to go from the Digital Receiver to the PVR-150
- MythDora 4.0 – Thanks MythDora developers!! Follow the excellent instructions at MythPVR for a step by step install
- Mark’s PVR-150 Package – Please follow Mark’s instructions for installation and compiling. You will need the following packages before compiling. Type the following as root before running the ./setup.sh from Mark’s package:
- yum install dialog
- yum install kernel-devel-`uname -r`
- yum install gcc
- yum install make
- Hauppauge PVR-150 Firmware – As root, copy to your /lib/firmware folder
- Config Files: Please backup all files before overwriting them in case you have to go back for any reason
- change_chan.pl script
- Remove the .txt extension
- Place in your /usr/local/bin folder
- Type chmod +x /usr/local/bin/change_chan.pl
- Point to the file under MythTV Setup; Input Section. Select SVideo put /usr/local/bin/change_chan.pl in the “External Change Channel Command” box
- Modified lircd.conf file for the Happauge PVR-150 gray remote and the SA 2200 digital cable box. Rename the downloaded file to lircd.conf, and overwrite the existing /etc/lircd.conf file. Please see Mark’s blog if you have a different satellite or digital box. He explains how to find the proper codes for your box. Use my script as an example for the final script layout however.
- Modified lirc file located in /etc/modprobe.d directory. Remove the .txt extension then overwrite the existing /etc/modprobe.d/lirc file
- Add these lines to rc.local to the /etc/rc.local file:
- Reboot
- change_chan.pl script
All files – All the files above in a neat all in one package. Things that can go wrong:
- Software Installation:
- lirc_i2c is still being loaded on startup.
- Solution: Make sure you have performed step # 3 correctly. lirc_i2c usually loads because it is still in the lirc file under /etc/modprobe.d/ directory
- Permissions are set incorrectly, specifically the execute flag
- Files are not named correctly or in the wrong location
- MythTV is not setup correctly
- Modules are not loading correctly – See Mark\’s website for troubleshooting
- IR Blaster is trying to use the Serial port
- Solution – remove any entries in the /etc/modprobe.d/irblaster file, or just comment them out. I made the mistake of setting up irblaster from the MythDora setup screen and it caused me untold grief.
- lirc_i2c is still being loaded on startup.
- Hardware
- IR Blaster is not located correctly over the digital/satellite box IR Receiver. Use a flashlight to locate it under the front panel on the Digital Box
- IR Blaster and receiver not fully seated in the PVR-150
